Measuring the Molar Mass of an "unknown" gas
Teacher notes:
- The purpose of doing the procedure in this way (using the syringe) is to avoid getting
the lighter wet. The traditional way of doing this experiment is to place the lighter in
the water, and let the gas rise into the eudiometer. However, this means you need to
somehow dry the lighter – a difficult task in a one period class.
- If you don't have a barometer you can get the air pressure from a weather station –
BUT YOU HAVE TO ASK FOR THE ACTUAL STATION PRESSURE. Unless you happen to live at
sea-level, what the weather office will give you is an altitude corrected value. The
formula to do this is complex. However, they will know the real pressure because its
needed for setting airplane altimeters. You just have to ask the right question of
the the weather people and you can usually get the right value.
- The mass of gas is quite small. You really need a balance capable of measuring mg or
else you will have to use a much larger eudiometer. With a 50 mL eudiometer and a mg
balance, you will get 2 significant digits. If you only have a cg balance, you will have
to use a 250 mL graduated cylinder, to get the same level of accuracy.
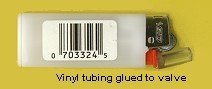
- Modify the lighter by gluing a short piece of vinyl tubing onto the valve. Use a hot
glue gun, put a little glue on the tubing, and hold it in place until cool. This extension
is necessary to allow the plunger of the syringe to press on the valve. Make sure that you
get no glue on the other parts, or the valve will be stuck (press the tubing and valve up
and down while the glue is cooling to make sure this doesn’t happen).
- A mini lighter will fit inside a 35 mL syringe. If you use a standard size lighter, you
will have to use a larger syringe.
- Step 7 in the procedure is important (measuring the original position of the plunger
before gas is released). The students need to know this position so that they can return
the plunger to this position after the gas is released, but before they pull the tubing
out of the eudiometer. This accounts for the volume change because of the change in
position of the plunger. Make sure that they pull the plunger back to its original
position (step 8) with the tubing high enough in the eudiometer that they will not draw
water back into the syringe.
- Students love to light the gas on fire. It’s not a good idea. There should be
virtually no oxygen in the eudiometer, so the flame burns at the top. However, it can get
to be a pretty big flame, and there is potential for a burn, or worse, air getting mixed
in the eudiometer and causing an explosion.
- Major sources of systematic error in this experiment are reproducing the original
plunger level, and trying to read the level of the gas in the eudiometer while the water
levels are equal. If you don’t mind the mess, one solution is to completely fill the
pail with water at the end of the experiment. It is then easier to adjust the levels, and
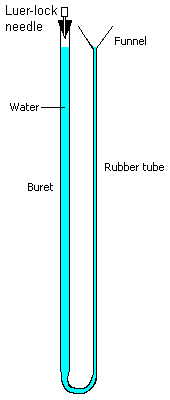
to read the eudiometer level. An alternative is to use a modified acid-base buret as a
water-filled manometer, as shown in this diagram. A large bore needle is placed through a
rubber stopper and the water levels adjusted to the 0.0 point on the buret. When the
levels are adjusted, attach the syringe to the Luer lock on the needle. You can test for a
gas tight setup by lowering the funnel (the levels will change, but become stable). The
same precaution about reading the original plunger level and then restoring it to this
level at the conclusion must be followed.

It is fairly easy to lower the funnel to get the water level the same in the eudiometer
and funnel side before reading the volume.
- Butane dissolves in rubber latex tubing. It is less of a problem if you use vinyl
tubing. It also probably dissolves slightly in the soft rubber of the plunger. At the end
of the experiment, disassemble the syringes to allow the butane to evaporate.
Copyright © 1998 - 2008 David
Dice